How to Back Up and Move a Company File
How to Back Up and Move a Company File
You may not think of your QuickBooks company file as being portable, but it is. While most of the time it stored safely on the hard drive of your desktop computer or laptop, there may come a time when you need to move it. The most common reasons a business moves its QuickBooks company files is because they’ve purchased a new computer or they want to share their data.
Fortunately, it’s possible to create a backup of your QuickBooks file and save it to a USB drive or CD, or another folder on your company’s network. Once it’s available at its destination computer (make sure a copy of QuickBooks has already been installed), you (or another recipient) will be able to restore it.
Note: These instructions were created using QuickBooks 2018. If you have a different version, please call.
Making a Backup
The first step is making a backup of your company file. Of course, you shouldn’t wait until you have to move a QuickBooks company file before backing it up, however. This is something you should be doing regularly.
Before you start, make sure your copy of QuickBooks is updated, which shouldn’t be a problem if you’re set up with automatic updates. If you’re not, and you’ve ignored those messages about updates that appear when you open QuickBooks, please call for assistance in launching a manual update and configuring QuickBooks to automatically update.
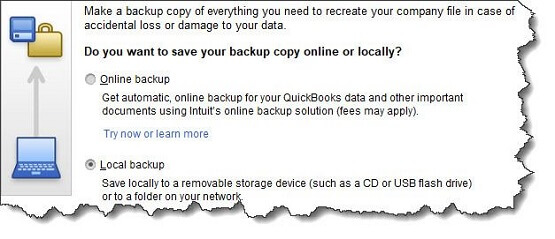
With QuickBooks in Single-User Mode, open the File menu and hover over Back Up Company. Select Create Local Backup. You’ll see this window:

Figure 1: You can save your QuickBooks backup copy locally or online.
Intuit offers a service called Intuit Data Protect that allows you to back up your company file online (please contact the office if this is something you’re interested in). Let’s assume for the moment though that you have a USB drive plugged into your computer and are ready for your backup.
Click the button next to Local backup, then the Options button. In the window that opens, you’ll select your destination location and answer a few questions about your backup. One of these gives you the option to get a reminder to back up your file every x times you close QuickBooks, should you choose to do manual backups.
Click OK to return to the Create Backup window, then click Next. The following screen gives you the option to save your file and/or schedule future (automatic) backups. If you choose to simply save it now, check that button and click Next to verify the destination location and file name.
Note: Before you save your backup file, give it a name that is different from your regular company file. Write down the exact file name and its location.
Click Save. A small window will open displaying your progress, and you’ll get a confirmation message when the file has been saved with a .qbb extension. You can now take the removable storage device to the destination computer, where QuickBooks should already be installed.
Warning: If you want to schedule automatic backups by clicking on one of the two options in the Create Backup window, please call first. Automated processes in QuickBooks can save time and and effort, but when you’re dealing with your irreplaceable company file, you must get it right.
Restoring a Backup File
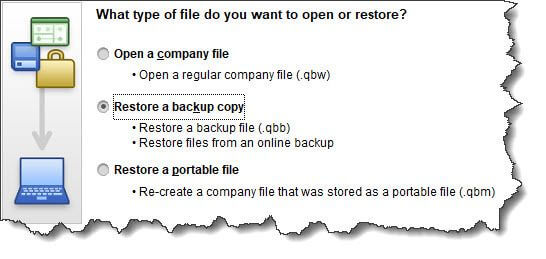
Once that is done, open the File menu and select Open or Restore Company on the destination computer. This window will appear:

Figure 2: QuickBooks displays this window when you select File | Open or Restore Company.
Click the button in front of Restore a backup copy. Click Next and select Local backup. Then click Next again. Click the down arrow next to the Look in field and click on the location of your backup file to display its contents. Browse until you find the file (it should end in .qbb), then highlight it by clicking on it. Click Open.
QuickBooks displays a window that asks where you want to restore your file. You’ll click Next to find it in the Save Company File as window. The Save in field should point to your main QuickBooks directory (like QuickBooks 2018) and the File name field should show the correct file name.
When everything looks correct, click Save. QuickBooks will convert your .qbb file to the standard QuickBooks file type, .qbw, and open it.
Call for Assistance
Losing your QuickBooks data, as you know, would be disastrous. But there may be occasions when you’ll need to open a backup copy of your company file on a different computer. As always, if you need assistance from a QuickBooks professional, don’t hesitate to call.

